MainStage Mondays: How To Use Compressors
This week’s quick MainStage tutorial is about compressors. Compressors are plugins that manipulate the dynamics of the sound source, creating everything from a “squeezed” punchy sound to subtle level control. MainStage just updated their main compressor plugin, and I’m a big fan. Here’s how to use it:
1. Open MainStage. Select a template.

2. Click on the first channel strip in your patch, then select Dynamics>Compressor>stereo.

Here’s what the plugin looks like:

Here’s what the bottom parameters do:
Input Gain: This controls how loud your original sound comes into the compressor.
Threshold: This controls where the compressor starts to “compress” the sound.
Ratio: This controls how drastically you compress the signal.
Make Up: This boosts or reduces the level of the signal coming out of the compressor.
Auto Gain: This allows the plugin to automatically adjust the volume of the compressor so it stays at the right level.
Knee: This controls the shape of your sound.
Attack: This controls how fast your compressor starts compressing.
Release: This controls how long it takes for your compressor to stop compressing.
The side parameters on the plugin control a limiter (more on that later) Here’s what the side parameters do:
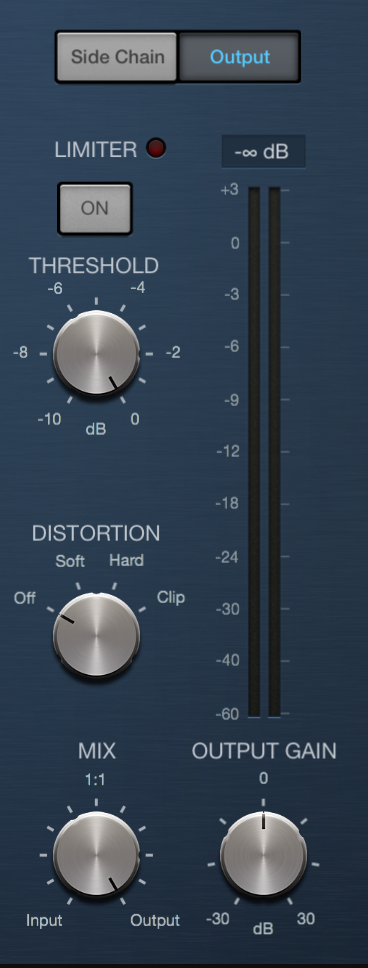
Threshold: Same as above.
Distortion: This controls how much distortion (if any) is introduced into the signal when you limit it.
Mix: This controls how much of the original sound you let through.
Output Gain: This controls how loud your sound comes out of the compressor.
(Note: MainStage offers seven different compressor models to choose from, but all of the models use essential the same features.)